To get access to the Joan Workplace Digital Signage, you can enable it in your Joan portal. Our team will provide you with a URL of your CMS instance and share your login details. Additionally, it is highly advisable to book a demo with us here for an in-person overview of the capabilities.
Initial setup
To begin using the CMS, you will receive a dedicated URL that provides access to your CMS instance and initial credentials for the administrative user account.
To display the content on your device for the first time, you will need to complete the following steps:
To change the content subsequently, you can only modify the playlist without going through other steps.
Some of these steps may have already been completed by our team. If that's the case, feel free to skip those and continue with the remaining steps
Pairing your display
Initial notes
All display devices are called "Players" in the CMS.
The pairing procedure for Joan displays is different from the one for LCD displays.
Furthermore, the procedure for LCDs differs depending on whether they use a software-based player or a hardware-based one.
Joan displays
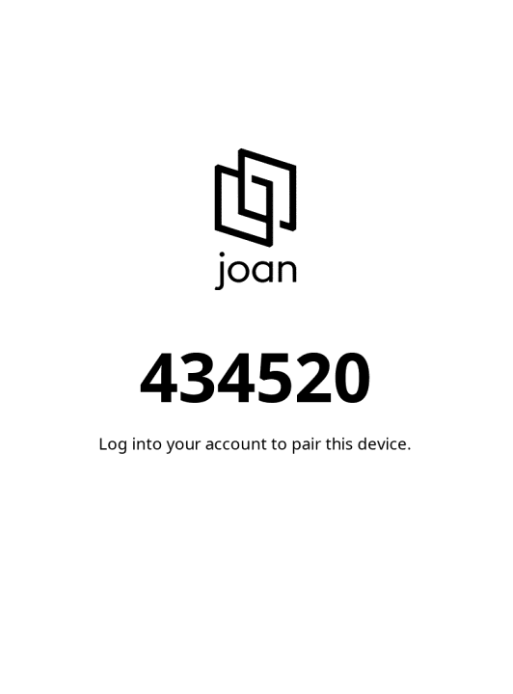
First, configure your device for your network and the CMS server by following the instructions on this link, and in step 10 under Advanced connectivity, enter the server cms-1.dk.visionect.com. Soon, the device will show a PIN code that is used to pair the device with your CMS account.
Please note that it may take up to 15 minutes for the code to show up after a successful configuration.
Make sure the PIN contains only numbers. If it contains letters and numbers, that is the PIN for the Joan portal and currently can't be used with the CMS. In such a case, please reach out to support@getjoan.com.
-
First, choose E-Ink Player as the device
- Then, enter the name of the player. Choose something descriptive, as this device will be referred to by this name elsewhere in the CMS. Example: “Entrance”
- Next, we enter the activation PIN code that is displayed on your Joan display. (You can "skip for demo purposes" that will create a virtual E-Ink Demo Player if you don't have a device yet, in such a case, please refer to this guide).

When the player is registered, it will display a blank screen with status notes at the bottom of the display. Now we can adjust its settings, add it to a group, and then assign a playlist. Please continue here.
LCD displays
LG and Samsung digital signage displays
For digital signage displays from LG based on WebOS and Samsung ones based on Tizen OS we provide software players that are installed directly in the displays.
For LG displays follow this guide.
For Samsung displays follow this guide.
When done, you will be presented with a screen displaying a PIN. To pair the display, please provide the PIN to our support team, and they will pair it with your CMS instance.
Please note that only digital signage displays from LG and Samsung are supported. TV models are not supported even when they run WebOS or Tizen operating systems due to technical limitations. We can provide a list of supported models on request.
All the other LCD displays
For displays other than the above-mentioned, we provide a Linux-based OS image that can be installed on any reasonably powered PC. Typically, a Mini PC form factor is recommended, so it can be mounted behind or near the display.
For installation of player software on a PC-compatible hardware follow this guide.
Assigning the player to a group
After the player has been paired to the CMS, we need to assign it to a group. This is mandatory for Joan devices, so the correct settings for e-paper technology are applied to display the content. Please follow the steps below to assign your Joan device to a device group.
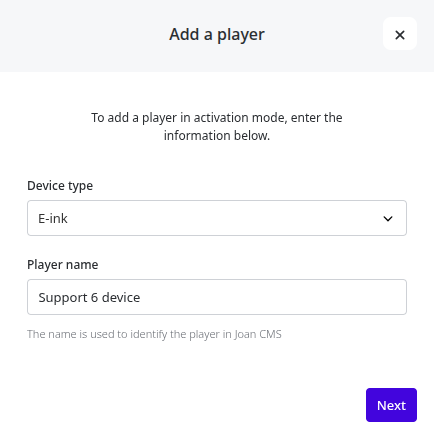
- Navigate to Player Groups in the top menu
- Create a new player group by clicking on the button on the top right
- Give a name to the Player Group, and we also need to select if it is an E-ink player group or not, which will give us a list of our devices accordingly

- Assign the Player by clicking the Add button next to the player's name
- Click Create to finalize the Player group
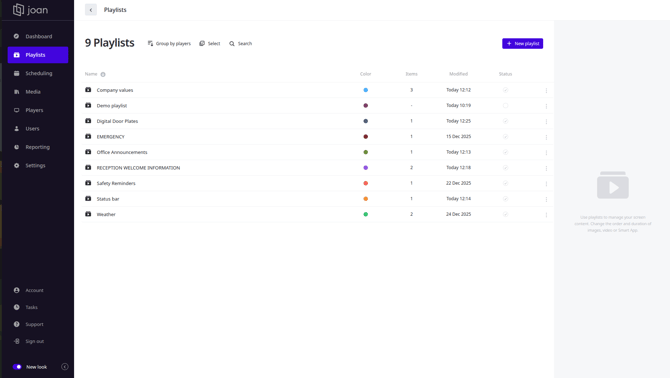
Creating a playlist
Once you have successfully paired your device and assigned it to a group, you are ready to create your first playlist.
To do so, first navigate to Playlists on the left menu.
- Click on +New playlist.
- Name your playlist and select if this playlist will be an E-ink or LCD playlist with the toggle.
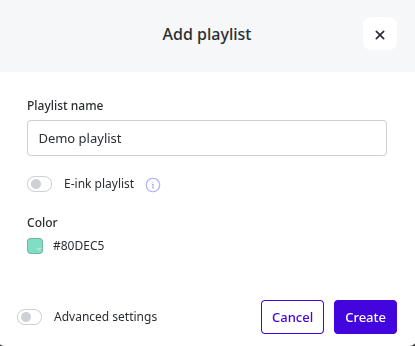
- Optionally, select a color for your playlist so you can find it easier later for scheduling.
- Click Create.
Congratulations, your first playlist has been successfully created. Now you can add some content that you wish to display in this playlist.
Editing the playlist
- In the menu item Playlists, and click on the playlist you want to edit.
- The playlist view is divided into Playlist timeline at the top, the current page details panel on the right side, and the media library in the middle.
- The content can be added to the media library by dragging direclty from your desktop to the media library panel. See here for supported media types.
- To add a page to the playlist, drag some content from the content panel to the playlist timeline panel. Use the Library tab to drag ready-made content, or the Apps tab to add apps that require some additional info and then render by themselves as pages. Another option is to click Create in the timeline panel to create a new page from scratch. In this case, a page editor will open up, which is a full graphics editor that can work with images, text, widgets, and other elements.
- Once you have finished customising your playlist, click on the Publish button.
This will apply all the changes you made to the playlist.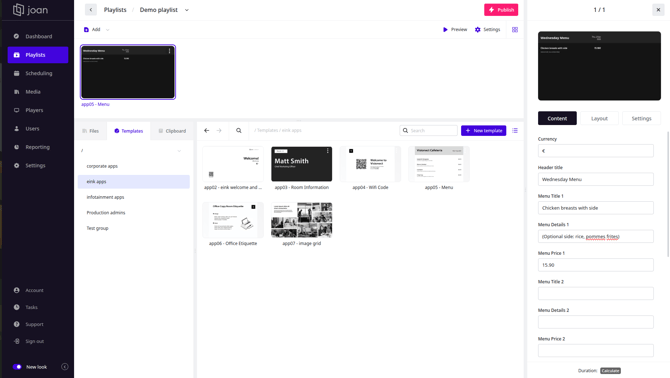
Schedule the playlist to your device
To schedule your newly created content to the device, navigate to Scheduling.
- Select the Player (or Player Group) on the left tab for which you wish to create a Schedule.
- Click Add or click directly on Calendar on the desired timeslot.
- The Add a schedule window will open.
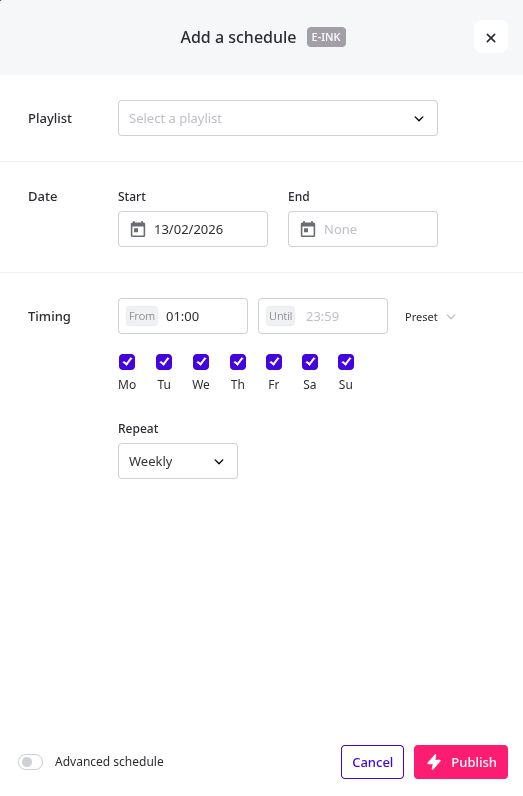
- Select the Playlist you want to play on your screen.
- Select the start and end date for your playlist. If no end date is set, the playlist will continue playing forever.
- Select start and end times in the day for your playlist.
- Select the recurrence of your playlist.
- Click Publish, and that is it!
Congratulations! You have successfully scheduled your content to your display!
It will start playing on your device in a couple of minutes.
If you encounter any issues, please reach out to us at suppport@getjoan.com.
Further steps
For more information, please see the built-in manual in the CMS or click here.