General settings are available for Admin and Office manager users under Settings -> Visitors -> General settings.
Once you activate Visitor Management for a particular building, you gain the ability to customize the settings for each individual building.
1. Enable Visitor notifications
In this section, you have the possibility to enable the following emails:
- Invitation email - this is sent to the visitor after an invitation is created
- Welcome email - this is sent to the visitor after they check-in
You can enable each email option separately by using the toggle button. Each of the emails can be configured by clicking Edit invitation/welcome email. The additional features included in each email can be enabled separately. The feature options are:
- Show visit details and host name
- Show location - you can also include a Google Maps directions link
- Easy check-in - by enabling this feature, visitors can check in via a pre-registration link from the Invitation email
- Attach signed document - this can be enabled under the Welcome email. If you have document signing enabled under the general settings, the visitor will need to sign a document before they check-in. The signed document can then be attached to the Welcome email
- Additional info - in case you want to include extra details in the invitation/welcome email such as the WiFi password or the location of the meeting room
2. Who can create new visits?
It is possible to adjust who can create new visits. The options to choose from are:
- All employees
- Office Manager and Admin
3. Automatic visitor registration via room calendar
With automatic visitor registration, you can invite visitors directly from your calendar and have their visit automatically logged in the portal with no manual entry required. Simply add invite@getjoan.com as a guest when creating your calendar event, and the system will handle the rest.
For more information, please check our knowledge base article here.
4. Document Signing
By enabling document signing, you can select which document is required to be signed by the visitor. The documents can be edited in the Visitors -> Documents section.
After enabling the Document signing feature, you can set whether you want the signed documents to be sent to a specific email address.
5. Visitor Log
You can view past, present or future visits by navigating to Schedule -> Visitors -> Visitor Log. Using the filter from the drop down menu, you can select the time frame to view only events in the selected time frame.
6. Enable Visitor photo
When this setting is enabled, visitors will be prompted to take a photo directly on the tablet during the sign-in process. The captured photo is then automatically printed on their visitor badge, making it easy to visually identify visitors on-site.
7. Maintenance email
The maintenance email setting allows you to designate a specific email address to receive all communications related to the upkeep and maintenance of your connected devices, including printers, tablets and badges.
Host notifications
To enable general notifications that you will receive as a host, please follow these steps:
- Log into your my.getjoan.com account
- Navigate to "Settings" -> "Account" -> "Notification settings"
- Under Visitor Notifications allow which notifications you would like to receive
- Click "Save"
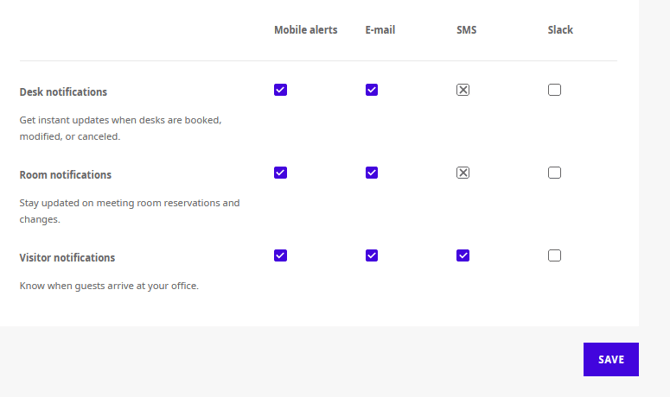
For now, this section offers you the possibility to enable the following:
- Visitor arrival mobile application notifications - after a visitor checks in, the host will receive a notification from Joan Workplace management application
- Visitor arrival email notifications - after a visitor checks in, the host will receive an email notification of their arrival
- Visitor arrival SMS notifications - after a visitor checks in, the host* will receive an SMS notification of their arrival
- Visitor arrival Slack notifications - after a visitor checks in, the host will receive a Slack message from the Joan Bot**
For more information please check our knowledge base article here
In case you require any assistance, please reach out to support@getjoan.com.