Inviting Visitors
In order to efficiently manage visitors on-site, you can send them an invitation and book the meeting in advance. Of course, visitors have the option to arrive on-site and request an ad-hoc appointment with a known host.
You will need to enable the visitor management option in your Joan Desk Booking Application. There are two invitation options. One is Visitation and the other is Invites:
- Visit - this is for inviting visitors who are already on your premises but don't have a scheduled invitation
- Invite - this is for making scheduled visitations
Visitors can be invited by a host, or they can request an ad-hoc meeting.
How to create a new visit
Did you have an unexpected meeting and want to keep track of who is in your office? No need to worry, you can create a new visit invite for someone who is already on-premises, to easily document your arrivals.
1. Log in to my.getjoan.com
2. Navigate to Schedule and click Visitors from the left-hand menu
3. Click Visits and then New Visit (top-right)
4. Fill out the visitor's information and select if you wish the host to be notified*
5. Click Save.
*If you enabled the host notification, then the host will receive an email notification with the visit details.
How to create a new invite
1. Log in to my.getjoan.com
2. Navigate to Schedule and click Visitors from the left-hand menu
3. Click Visits and then New Invite (top-right)
4. Fill out the visitor's information and select if you wish the host and visitor to be notified
5. Click Save.
If you enabled the host/visitor notification, then the host/visitor will receive an email notification with the visit details. In case you include the easy check-in option for the invitation email, then the visitor will be able to fill out any documents at home. They will receive a pre-registration link via email.
How to create multiple invites (CSV)
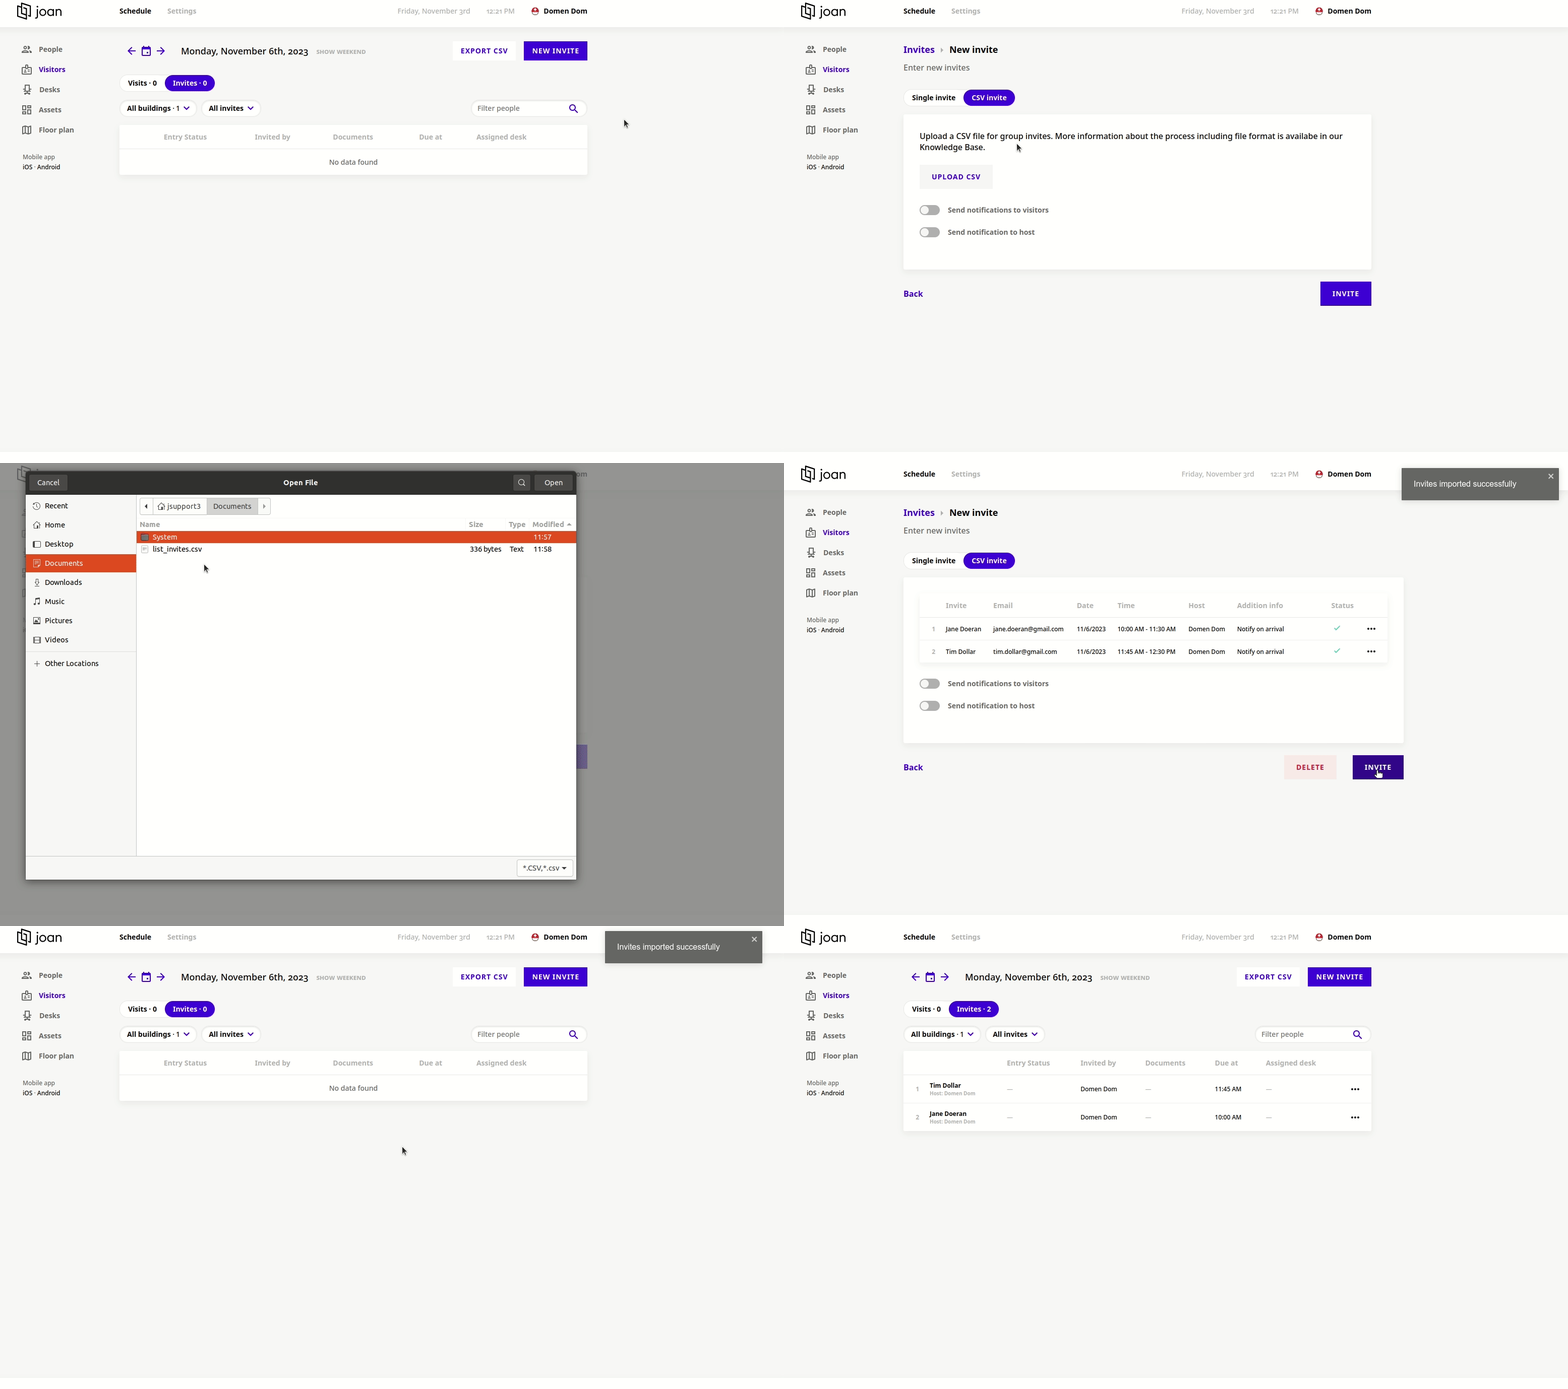
In a situation where you need to create multiple invites, the best option is to use the CSV invite method, where you're able to import a .csv file with the necessary information, to invite multiple people.
1. To do a bulk import of the invites at once, please prepare a .csv file with the following structure:
full name, email, meeting start time (YYYY-MM-DDTHH:mm:ssZ), meeting end time (YYYY-MM-DDTHH:mm:ssZ), building name, host email, additional information, company name, phone.
An example:
Jane Doe, jane.doe@gmail.com, 2023-11-06T09:00:00Z, 2023-11-06T10:30:00Z, Office, admin_host@gmail.com, Notify on arrival, Meteronomics, +1 320 592 49
2. In MyJoan, navigate to Schedule --> Visitors --> Invites
3. Click on New Invite --> Upload CSV --> click on Choose file and locate the .csv file --> select the file and click on Open
3. If there's no issues, you will see the invites on the screen, as well as the notifcation 'Invites imported successfully'
4. Click on Invite again, to import the Invites into the system
5. The invites will now appear on the list
6. Optionally, you can also toggle the buttons to Send notifications to visitors and Send notifications to host

How can a visitor create an ad-hoc meeting
In case a visitor doesn't have a scheduled reservation, they can request an ad-hoc meeting once they arrive at your office. An ad-hoc meeting can be requested in two ways:
- By scanning the QR code on the tablet that you use for Visitor Management
- By filling out their information via the tablet that you use for Visitor Management
Creating an ad-hoc meeting by scanning the QR code
When a visitor arrives at your office and would like to request a meeting, they have the option of doing so by scanning the QR code that is displayed on the tablet you use for Visitor Management at your reception. The code needs to be scanned with their mobile phone, and they will then be redirected to fill out their details. An email notification will be sent out to the account admin*.
Creating an ad-hoc meeting by filling out your information
Alternatively, when a visitor wants to request an ad-hoc meeting, they can also click the Continue button on the tablet you use for Visitor management. They will then be prompted to fill out their details and select a host. Once the details are filled out, the account admin* will receive a notification email.
*In future, the notification will be sent to the meeting host
In case you require any assistance, reach out to support@getjoan.com.
